
Configuring ADFS 2.0 for itslearning eLogin.
Introduction
These are instructions for itslearning customers to set up ADFS for integration with itslearning's elogin component.
Prerequisites
-
A working ADFS installation.
-
Make sure the site is SSL enabled with commercial certificates. Attempts to use self signed certs have been unsuccessful.
-
A site on itslearning which has eLogin enabled.
-
The site must have users imported through IMS E, IMS ES or CSV, and they must have a SyncID in itslearning that correspond to a claim / attribute exposed via ADFS.
Setting up ADFS 2.0 for use with itslearning elogin
Exchange SAML metadata
Unless already done, you will have to obtain itslearning's metadata, and itslearning will need your metadata.
Contact your itslearning consultant for assistance.
-
All actions in this procedure must be carried out for for itslearning's test environment and production environment! Before entering production, a working configuration must have been validated in test.
-
It is currently not possible for itslearning to subscribe to metadata to support dynamic changes, as ADFS metadata will have to be manually edited by itslearning's team of consultants to work. This means that if you change your ADFS configuration in a way that changes the metadata, you must contact your itslearning representative to have the change tested and implemented on itslearnings side!
Add a Relying Party Using Metadata
We firstly need to enable a trust relationship between the ADFS service and eLogin.
-
In AD FS 2.0 Managemetn application, in the console tree, right-click the Trust Relationships -> Relying Party Trusts folder, and then click Add Relying Party Trust to start the Add Relying Party Trust Wizard.
-
On the Select Data Source page, enter a URL to the metadata for elogin or browse to it on the local computer.
-
Select the display name (eg. MyService or elogin), I will assume this is itslearning.com
-
Permit all users to access the relying party
-
Review the settings and click Next, and then Close.
-
Right click on the relying party for elogin under Relying Party Part Trust.
-
Under Advanced, make sure the Secure Hash Algorithim is correct. From R74, elogin supports both SHA-1 and SHA-256, but selected value needs to correspond to the secure hash algorithm specified in the elogin configuration.
-
Click OK to save the changes.
Edit Claim Rules for Relying Party Trust
This step will allow the correct attributes to be retrieved from ADFS
-
The Edit Claim Rules dialog box should already be open. If not, In the ADFS 2.0 centre pane, under Relying Party Trusts, right-click elogin.mydomain.com, and then click Edit Claim Rules.
-
On the Issuance Transform Rules tab, click Add Rule.
-
On the Select Rule Template page, select Send LDAP Attributes as Claims, and then click Next.
-
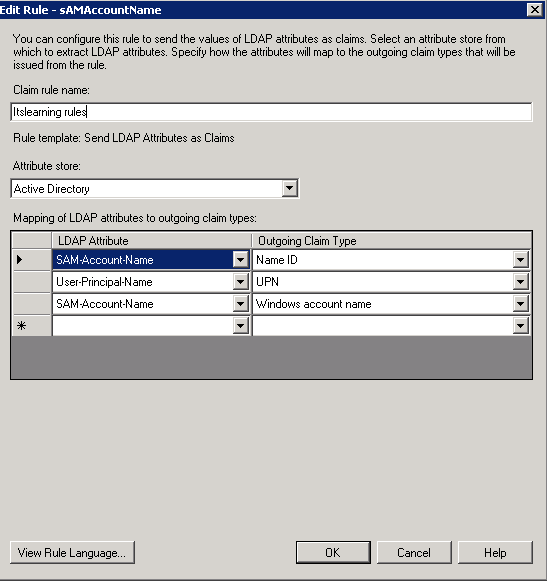
On the Configure Rule page, in the Claim rule name box, type Get Data.
-
In the Attribute Store list, select Active Directory.
-
In the Mapping of LDAP attributes section, create the following mappings
Itslearning requires one attribute to be set as "NameID". This must be a value that uniquely identifies the user within Active Directory.
In addition, there must be at least one other attribute issued. This attribute must uniquely identify the user in itslearning, and may be the same LDAP attribute as the "NameID"
A typical setup would look like this:
|
LDAP Attribute |
Outgoing Claim Type |
|
sAMAccountName |
NameID |
|
SAM-Account-Name |
Windows account name |
|
UserPrincipalName |
UPN |
Custom rules
In the event that there is no single field in AD that also exists in itslearning, it will in many cases be possible to create custom rules to transform attributes into something that has been imported to itslearning from the MIS.
A common scenario is the use of eduPersonPrincipalName as an attribute imported from an MIS. This may not exist as a standalone attribute in Active Directory, but have in many cases been created in the MIS using sAMAccountName in Active Directory as a source.
See http://technet.microsoft.com/en-us/library/ee913558%28v=ws.10%29.aspx for more information on the claim rule language.
-
On the Issuance Transform Rules tab, click Add Rule.
-
On the Select Rule Template page, select Send Claims Using a Custom Rule and click Next.
-
In the Configure Rule page, in the Claim rule name box, type Transform samAccountName to ePPn
-
In the Custom Rule window, type or copy and paste the following:
c:[Type == "http://schemas.xmlsoap.org/ws/2005/05/identity/claims/upn"] => issue(Type = "urn:oid:1.3.6.1.4.1.5923.1.1.1.6", Value = c.Value + "@mydomain.com", Properties["http://schemas.xmlsoap.org/ws/2005/05/identity/claimproperties/attributename"] = "urn:oasis:names:tc:SAML:2.0:attrname-format:uri");

adfs2.png
In the above example, @mydomain.com is appended to the samAccountName to generate an ePPn of [email protected] This should be customised to individual customer requirements. (e.g. [email protected]).
The object-identifier-style uniform resource name (URN) string urn:oid:1.3.6.1.4.1.5923.1.1.1.6 is the formal SAML 2.0 name for the eduPersonPrincipalName attribute—a name that the Shibboleth SP software understands by default.. Elogin also understands this from the web.config file.
Seamless logon with IWA
For the ADFS site in IIS, the default authentication method should be changed to IWA (Integrated Windows Authentication). This will turn off the form based authentication prompt, and login directly to the learning platform. To accomplish this, changes need to be made to the web.config file which is usually located in C:\inetpub\adfs\ls. Look for a section which starts microsoft.identityServer.web and change the section labelled localAuthenticationTypes so that it looks like this
<localAuthenticationTypes> <add name="Integrated" page="auth/integrated/" /> <add name="Forms" page="FormsSignIn.aspx" /> <add name="TlsClient" page="auth/sslclient/" /> <add name="Basic" page="auth/basic/" /> </localAuthenticationTypes>With this configuration, if a Windows PC is logged into the same domain as the Active Directory server, the user will already be authenticated to ADFS upon accessing an ADFS protected resource. Outside of the domain (e.g. from home) authentication will fall back to basic authentication.
Browser Considerations
In order for seamless logins to work, the browser must trust the URI of the ADFS site (e.g. adfs.mydomain.com). The following changes need to be made depending on the browser that is utilized by the end user.
Chrome and Internet Explorer 8 and above
-
Open the Control Panel in Windows and choose All Control Panel items in the address bar
-
Select Internet Options
-
Select the Security tab
-
Select Local Intranet
-
Click on Sites
-
Click on Advanced
-
Add the site for the ADFS service e.g. https://*.mydomain.com
Firefox
-
In a Firefox browser window enter in the text about:config into the URL bar
-
In the search bar type network.automatic-ntlm-auth.trusted-uris
-
Choose Modify and enter the domain of the ADFS site e.g. mydomain.com
Troubleshooting
Certificate Management
Note: the below is only applicable when setting up the ADFS server for the first time - we can assume that the customer will already have this under control!
The ADFS service must be able to read the certificate for the URL it is hosted on (e.g. https://adfs.mydomain.com). In order to import the commercial certificate correctly into Windows, the following stops should be followed:
Firstly if the certificate is in PEM format it is necessary to merge it with the private key into a PKCS7 format certificate (PFX file). This can be done using the openssl tool as follows:
openssl pkcs12 -export -out certificate.pfx -inkey privateKey.key -in certificate.crtThen follow these steps on the Windows Server:
1.) Start the Management Console.
Start --> Run --> MMC
2.) Add the Certificate Management Snap-In for a Computer Account.(Local Computer)
3.) Add the Certificate Mangement Snap-In for a Service Account (ADFS 2.0 Windows Service)
3.) For each of the Certificate Snap-Ins add the PFX certificate in to the Personal store.
4.) Under the Certificates folder within Certificates - Local Computer, right click on the certificate just imported and select All Tasks --> Manage Private Keys
5.) Within the security tab make sure full access is given to the NETWORK SERVICE account.
6.) Click OK and end all MMC snap in dialogues.
An ADFS error is encountered as follows
Encountered error during federation passive request. Additional Data Exception details: Microsoft.IdentityServer.Web.RequestFailedException: MSIS7012: An error occurred while processing the request. Contact your administrator for details. ---> Microsoft.IdentityServer.Protocols.WSTrust.StsConnectionException: MSIS7004: An exception occurred while connecting to the federation service. The service endpoint URL 'net.tcp://localhost:1501/samlprotocol' may be incorrect or the service is not running. ---> System.ServiceModel.EndpointNotFoundException: There was no endpoint listening at net.tcp://localhost:1501/samlprotocol that could accept the message. This is often caused by an incorrect address or SOAP action. See InnerException, if present, for more details.Server stack trace: at System.ServiceModel.Channels.ConnectionUpgradeHelper.DecodeFramingFault(ClientFramingDecoder decoder, IConnection connection, Uri via, String contentType, TimeoutHelper& timeoutHelper) at System.ServiceModel.Channels.ClientFramingDuplexSessionChannel.SendPreamble(IConnection connection, ArraySegment`1 preamble, TimeoutHelper& timeoutHelper) at System.ServiceModel.Channels.ClientFramingDuplexSessionChannel.DuplexConnectionPoolHelper.AcceptPooledConnection(IConnection connection, TimeoutHelper& timeoutHelper) at System.ServiceModel.Channels.ConnectionPoolHelper.EstablishConnection(TimeSpan timeout) at System.ServiceModel.Channels.ClientFramingDuplexSessionChannel.OnOpen(TimeSpan timeout) at System.ServiceModel.Channels.CommunicationObject.Open(TimeSpan timeout) at System.ServiceModel.Channels.ServiceChannel.OnOpen(TimeSpan timeout) at System.ServiceModel.Channels.CommunicationObject.Open(TimeSpan timeout) at System.ServiceModel.Channels.ServiceChannel.CallOnceManager.CallOnce(TimeSpan timeout, CallOnceManager cascade) at System.ServiceModel.Channels.ServiceChannel.EnsureOpened(TimeSpan timeout) at System.ServiceModel.Channels.ServiceChannel.Call(String action, Boolean oneway, ProxyOperationRuntime operation, Object[] ins, Object[] outs, TimeSpan timeout) at System.ServiceModel.Channels.ServiceChannelProxy.InvokeService(IMethodCallMessage methodCall, ProxyOperationRuntime operation) at System.ServiceModel.Channels.ServiceChannelProxy.Invoke(IMessage message)This usually has two possible explanations:
i.) The ADFS service account does not have access to the private key within the certificate for the site. To correct this make sure the certificate is imported as a PFX file which contains both key and certificate. Also make sure the service account has access to the key by doing the following:
-
Start MMC (Start --> Run --> MMC)
-
Add the Certificates snap-in for a Computer Account (Local Computer)
-
In Certificates, right click the certificate for ADFS and click All Tasks --> Manage Private Keys
-
Make sure NETWORK SERVICE has access to the key. If not click Add to add permission. (NETWORK SERVICE is usually the service account used for ADFS 2.0 Windows Services, check in services to be sure )
-
Restart ADFS 2.0 Web Services, under the services manager (Run services.msc)
ii) Another program is using the ADFS TCP ports (1500 and 1501). To correct this try the following:
-
Launch PowerShell
-
Add the AD FS 2.0 PowerShell snap-in:
add-pssnapin microsoft.adfs.powershell-
Configure the Services net.tcp port via the Set-ADFSProperties cmdlet:
Set-ADFSProperties -nettcpport 1601-
Confirm the change
Get-ADFSProperties-
Restart the AD FS 2.0 service in the Services console and then: Get a WMI object into a $temp variable:
$temp= Get-WmiObject -namespace root/ADFS -class SecurityTokenService-
Set the ConfigurationServiceAddress property to the new net.tcp address using the new port:
$temp.ConfigurationServiceAddress="net.tcp://localhost:1600/policy"-
Write your change back to the object:
$temp.put()-
Restart the AD FS 2.0 service in the Services console
The customer's original metadata file can be retrieved from https://adfs.customerdomain.tld/FederationMetadata/2007-06/FederationMetadata.xml or the customer can send it to you.
Table of contents