- Content and tool integrations
- Getting started
- Build Applications!
- Build Plugins or Modules!
- test page
- Organisation API
- DataService.svc methods and messages
- Create.Calendar.Event and Update.Calendar.Event
- Create.Course.Element.Assignment
- Create.Course.Element.CustomActivity
- Create.Course.Element.File
- Create.Course.Element.Folder
- Create.Course.Element.IMSPackage
- Create.Course.Element.Instance
- Create.Course.Element.Link
- Create.Course.Element.Page
- Create.Course.Element.Survey
- Create.Course.Element.Test
- Create.Course.File
- Create.Course.Folder
- Create.Course.Planner
- Create.Extension.Instance
- Create.MyFiles.File
- Create.MyFiles.Folder
- Create.Resource
- Delete.Calendar.Event
- Delete.Extension.Instance
- Delete.Person.ProfilePicture
- Update.Calendar.Event.ConnectEvents
- Update.Course.Element
- Update.Course.Element.CustomActivity
- Update.Course.Element.CustomActivity.Assessment
- Update.Course.Element.LearningObjective.Assessment
- Update.Course.Planner
- Update.Extension.Instance
- Update.Person.ProfilePicture
- Update.WarningLetter
- ReadDataService methods
- Read.Courses
- Read.Terms
- Read.LearningObjectives
- Read.WarningLetter
- Read.Course.Planner.Lessons
- Read.Course.Files
- Read.Course.Gradebook.Assessments
- Read.Course.Gradebook.Items
- Read.Course.Gradebook.Categories
- Read.Course.Elements
- Read.Course.Element
- Read.Calendar.Event
- Read.AssessmentScales
- Read.AssessmentRecord.Summary
- Read.Projects
- Read.Projects.ForPerson
- Read.Courses.ForPerson
- Read.BehaviourRemarks
- FileService.svc methods and messages
- FileStreamService.svc methods and messages
- InstanceService.svc
- Working with calendar events
- Migrating content to itslearning
- Handling rich content and files
- DataService.svc methods and messages
- Data Warehouse API
- How to Access the Data Warehouse via OData
- Best Practice for Accessing OData
- Scenarios and Examples
- Data warehouse API data model reference
- AssessmentGrade
- AssessmentScale
- AssessmentStatus
- ConsumerType
- Course
- CourseElement
- CourseElementFileAssociation
- CourseMembership
- CourseProfile
- CourseVisit
- Date
- ElementCategory
- ElementType
- File
- LearningItem
- LearningObjective
- LearningObjectiveAssessment
- LearningObjectiveAssessmentStatus
- LearningObjectiveCourseElement
- LearningObjectiveProgress
- Organization
- OrganizationMembership
- Scorm
- ScormStatus
- SiteProfile
- Term
- Time
- User
- UserCourseSession
- UserElementSession
- UserGrade
- UserLogin
- UserSession
- IMS Enterprise Services
- IMS ES best practices and howtos
- Getting started with IMS ES
- Dos and don'ts for itslearning IMS ES clients
- How to assign profiles to users
- Creating organisations
- Creating parent/child relationships
- Marking an organisation as a user's "home organisation"
- Creating courses and course groups
- Working with course templates in IMS ES
- ECK-iD and Dutch educational content chain
- Managing persons
- Managing groups
- Managing memberships
- IMS ES Template
- IMS ES best practices and howtos
- Ad-hoc LTI tools in course
- LTI tools pre-set using Developer Portal
- LTI standard parameters
- Custom parameter substitutions
- Other resources
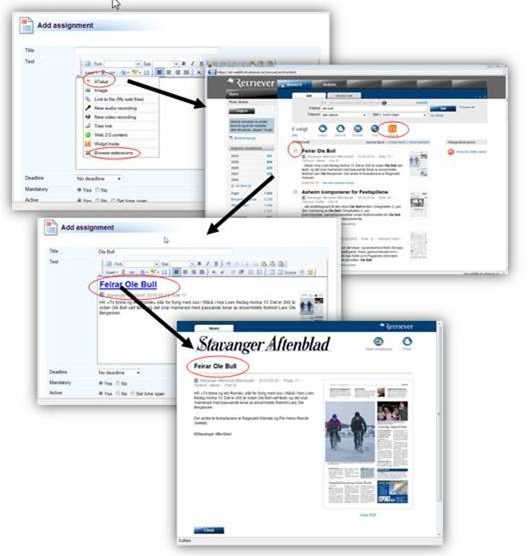
Workflow of adding a plugin to itslearning content
For the end user
-
Go to any location where the rich text editor is used, for example try to add an Assignment to a course.
-
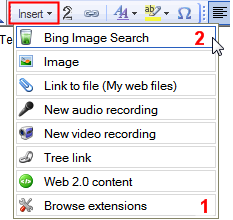
To use the plugin one must first add it to the insert list. This is done by clicking "Browse extensions" [1] and finding your plugin in the list of available extensions. Click "Include" to make it appear in the drop down [2].
-
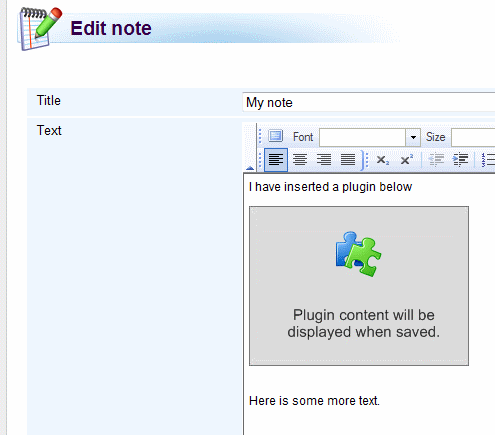
Click on the plugin you just added to your insert list[2] to insert an instance of the plugin to your note. You will be taken to the plugin site to generate some content (e.g. draw an image or choose an article). When you're done with that the plugin will post the data back to itslearning and you will see a placeholder for it in the rich text editor. The plugin placeholder image will be placed where your cursor was located when you launched the plugin from the insert menu. You can reposition the plugin content by moving the placeholder image.
-
When clicking 'save' in the rich text editor you are taken to your note with the embedded plugin content (In this case an image of the characters from Big Buck Bunny)
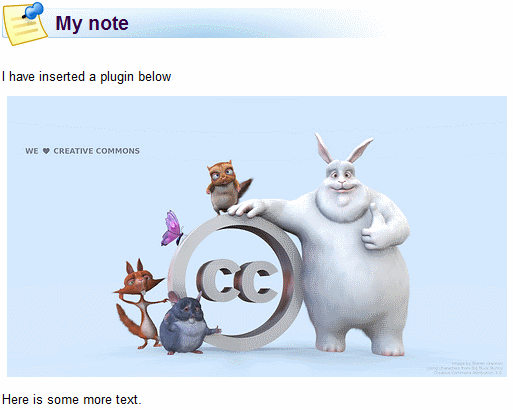
The image in the note is licensed under Creative Commons Attribution 2.0 Generic, courtesy of Steren Giannini ( http://www.flickr.com/photos/steren/ )
Behind the scenes
When the teacher chooses a plugin from the insert menu authentication is sent to the plugin site in the query string.
Technically, a plug-in sends HTML content to itslearning which itslearning inserts into the text editor. Available plug-ins will be presented to the teacher in a drop down in the rich text editor. When the user selects a plug-in he is sent to the external plugin web site. Depending on the plug-in site the user might interact with the web page to create or customize the content of the plug-in. The content is then sent back to itslearning and inserted into the editor.
Example workflow with the Atekst plugin
With the plug-in from Atekst teachers and students easily can embed newspaper articles from the all Norwegian news archives directly in the text editor in itslearning.