
Handling rich content and files
Overview
This page describes the handling of rich content and files in the context of the Organisation API.
There are several places where Rich Content (HTML with embedded content) can be added to itslearning. Examples include: the area "text" of an Assignments, the content of a Rich Content block in a Page, etc. These pages usually contain formatted text, but can also contain links to images or other files.
Files in itslearning can be stored in several places:
-
MyFiles as private files. These can only be access by the user within itslearning.
-
MyFiles as web files. These are public to all on the WWW.
-
As a file element in a course. These can only be access by members of the course.
-
Embedded with the Rich Content block. This is the same as uploading the file to the Rich content block.
-
File content blocks in Pages.
-
In the assignment element.
-
In the Course Files area (imported resource files).
Parsing rich content
Any HTML imported must be well formed and to ensure it is valid, it will be pre-parsed in addition to checking internal external/links.To ensure the rich content displays correctly, you should ensure that:
-
The HTML does not include structure tags such as <body> or <head>.
-
The HTML is well-formed with no superfluous spaces.
-
Any internal links from the source system should be removed.
-
Any links to external (WWW) pages should be well formed and must contain a HTTP protocol. An example of a valid URL is https://www.somesite.com
Uploading files
All uploading of files is through the FileService.svc UploadFile method.
The file upload service itself only uploads the files to temporary storage, and provides a sync key as a reference.
It does NOT create an referrable entity (“element”) within Itslearning. In order to do this, you must create an element to hold your files using Create.MyFiles.File, Create.Course.File or Create.Course.Element.File, depending on your requirements.
For file to be used in rich content only, Create.MyFiles.File with the “public file” option is a good choice.
Alternatively, for use in Pages, see the special section on pages further down on this page.
Handling Links
The migration import system has two special rules when parsing links. This handles:
-
Links to itslearning course tree elements.
-
Links to files to be embedded in the HTML content.
Here the migration API looks for specific commands and replaces these with internal links. In the case of all external links, these are left untouched and will continue to function.
ITSLElementSyncKey=XX
This tells the import system to replace the ITSLElementSyncKey=XX with a link to the specified course tree element. XX is the SyncKey of the element.
ITSLFileSyncKey=XX
This tells the import system to replace the ITSLFileSyncKey=XX with a link to the specified file, w here XX is the Synckey of the file saved to My files (see CreateMyFilesFile).
ITSLRichTextFileSyncKey=XX
This tells the import system to replace the ITSLRichTextFileSyncKey=XX with a link to the specified file, where XX is the Synckey of the file uploaded via UploadFile method.
Note: In case if the element or file is missing this generates a warning, but the rich content block will still be created (assuming there are no other errors). The link tag will be removed from the HTML.
Adding links to elements
To link previously created elements within itslearning (e.g. a test element, surveys) in a rich content area:
-
Create a test element as described in Create.Course.Test.Element section.
-
In your HTML replace the link with the command ITSLElementSyncKey=XX, where XX is the content synckey.
See below for an example assignment request, which contains a link to a test element. The example request contains the following links in the description which will be displayed as rich content:
-
Internal links from other source systems cannot be interpreted by the itslearning will be removed.
-
Shows a valid link to the itslearning site. All valid links must start with either a http:// or https://.
-
An example link to a test element.
<Message xmlns="urn:message-schema"> <CreateCourseElementAssignment> <CourseSyncKey>123</CourseSyncKey> <Active>true</Active> <UserSyncKey>someschool/teacher1</UserSyncKey> <Title>My assignment</Title> <Description> <p> My assignment <a href="../some/internal/file.html">This is some internal file</a> <a href="/some/internal/Anotherfile.html">Another internal file</a> <a href="http://www.itslearning.eu/">itslearning</a> <a href="ITSLElementSyncKey=5ed749ad-c678-407e-aa90-af17d623493a">Link to My First Test element</a> </p> </Description> <Assessment>1</Assessment> </CreateCourseElementAssignment></Message>
The final output of the request will appear as below. The two internal links have been removed.
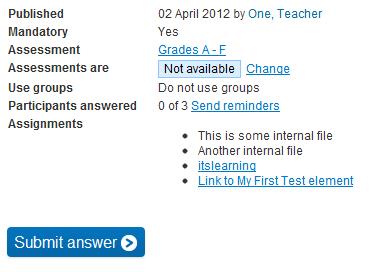
image2012-4-2 10:29:41.png
Adding links to my files
Using the same process as adding links to element, you can link previously created files from either the "My web files" or "My private files" area within itslearning in a rich content area:
-
Create a successful My File in either the public or private area as described in Create.MyFiles.File.
-
In your HTML replace the link with the command ITSLFileSyncKey=XX, where XX is the content synckey.
Handling files in Page content blocks
Special rules apply to linking content/files in Pages rich content blocks
Upload the file to the Rich Content Block
Upload the file using the FileService as with all other files to get a file synckey.
Then, In your HTML replace the link with the command ITSLFileID=XX. This tells the import system to replace the ISTLFileID=XX with a link to the specified file.
ITSLFileID (XX) needs to correspond to the FileID specified in the FileContents section of the page content XML. This is also where you make the connection between the FileID and the SyncKey (<Location> in this schema)
Example:
<ContentBlockSet> <ContentBlockText> <Title>My content block</Title> <Text><p>test2</p><p><img alt="Desert" border="0" src="ITSLFileID=1" style="padding: 5px 5px;"/></p></Text> </ContentBlockText> <FileContents> <FileContent> <FileId>1</FileId> <Location>6aa84a06-38f7-4f06-bc31-b8e005065218</Location> <Name>Desert.jpg</Name> <ContentType>image/jpeg</ContentType> </FileContent> </FileContents></ContentBlockSet>In the example above, the content block text element contains an image link with src attribute "ITSLFileID=1". This corresponds to the FileContent element with the same FileID.
During processing, the file described in FileContent element will be uploaded into content block. The image's src attribute will have its value replaced with the actual URL to the uploaded image.
If the file is not going to be part of content block, it should be referenced using standard HTML syntax.
You should NOT use links to "elements" from within Pages rich content blocks.
File content type
Each file should have a correct content type. It can be specified between ContentType tags. Incorrectly specified content type can lead to improper behavior when opening files from a web browser.
Reusing files
It is possible to reuse files within one request. To achieve it, we should specify the file multiple times in <FileContents> element. It is necessary to keep <FileId> values unique. Effectively, reusing a file means adding multiple <FileContent> elements with different ID’s but pointing to the same <Location>. Here’s a snippet from a request that shows a way to do that:
<FileContents> <FileContent> <FileId>1</FileId> <Location>fb193f30-bd1a-4f24-99a1-920419fb3cfc</Location> <Name>Pic1.png</Name> <ContentType>image/png</ContentType> </FileContent> <FileContent> <FileId>2</FileId> <Location>fb193f30-bd1a-4f24-99a1-920419fb3cfc</Location> <Name>Pic2.png</Name> <ContentType>image/png</ContentType> </FileContent></FileContents>And the complete request for creating a page:
<?xml version="1.0" encoding="utf-16"?><Message xmlns="urn:message-schema"> <CreateCourseElementPage> <CourseId>59</CourseId> <UserId>1</UserId> <Title>New Page</Title> <Content> <PageContent> <ContentBlockSets> <ContentBlockSet> <ContentBlockText> <Title>Title</Title> <Text>Text<p>This is text with the same picture used twice</p><p><img alt="Desert" border="0" src="ITSLFileID = 1" style="padding: 5px 5px;"/>;<img alt="Desert" border="0" src="ITSLFileID = 2" style="padding: 5px 5px;"/></Text> </ContentBlockText> <FileContents> <FileContent> <FileId>1</FileId> <Location>fb193f30-bd1a-4f24-99a1-920419fb3cfc</Location> <Name>Pic1.png</Name> <ContentType>image/png</ContentType> </FileContent> <FileContent> <FileId>2</FileId> <Location>fb193f30-bd1a-4f24-99a1-920419fb3cfc</Location> <Name>Pic2.png</Name> <ContentType>image/png</ContentType> </FileContent> </FileContents> </ContentBlockSet> </ContentBlockSets> </PageContent> </Content> </CreateCourseElementPage></Message>Please keep in mind that reusing files between subsequent requests is not possible for extension-related storage.